Add marker legs to your cup. Here is a summary of the drawing process for drawing legs.

Pin By Mookya M On Artist Alex Negrea Robots Drawing Robot Concept Art Robot Art
Draw rectangular shapes to form the arms.

. Please consider supporting my videos on Patreon. Draw two curved arms with hands. Skeletal structure study by Gvaat.
Take a light gray or blue color and paint the robot. Draw details on the body. 3 Draw your line art.
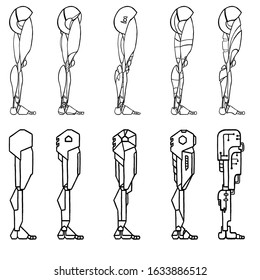
Now using long rectangles draw the legs and feet using semi-circles. Robots have figured prominently in science. Outline Start with a rectangle with two slanted sides.
You can also combine some elements present in your other designs. Arms and legs can be done with simple rectangles and oval shapes. Place a large U-shape upside down on the rectangle.
Square robot outline Step 1. All you have to do is draw a big cup like shape for robot Girs head. Directions for How to Draw a Robot Draw a rectangle body.
A robot or robots are simple figures to create but they can be complex if you are going for something detailed. Step 2 Below the body sketch two small rectangles to represent the legs. How to draw a robot.
Your drawing however may be slightly different and I encourage you not to draw the way I do more like take your own ideas and concepts and turn them into. Start with another oval just above the right shoulder and just like before a L-shaped hind leg and trapezoid for a foot followed by some claw lines and a curvy line for the tail with an oval for the end where the drill will go. Please consider supporting my videos on Patreon.
Next draw a horizontal line going across the lower half of Girs face like you see here. Using a semi-oval sketch out the head yep its looks like an inverted bucket. Face and Arms 4.
It could be a four legged robot based on an animal or a battle type robot or just a simple household robot. Draw antenna shaped ears. Again with slightly curved lines draw a long rectangle underneath the neck.
On the chest of our robot draw different arrows panels and other elements. Establish proportions and angles with skeletal guidelines then work on identifying and drawing the rhythms of the shape then fill in the muscle groups and finally rework the overall drawing correcting for any errors. Step 7 Fill colors in the robot as shown.
For a nice retro look you can use circular shapes with edges that are slightly pointed. The idea for a mechanical man replacement can vary but I made sure that a very basic version was drawn. Robots have been filling out Christmas stockings since Santa made his first ride so as the festive season draws near lets connect the circuits and open the lid on the mechanics of drawing our metal friends.
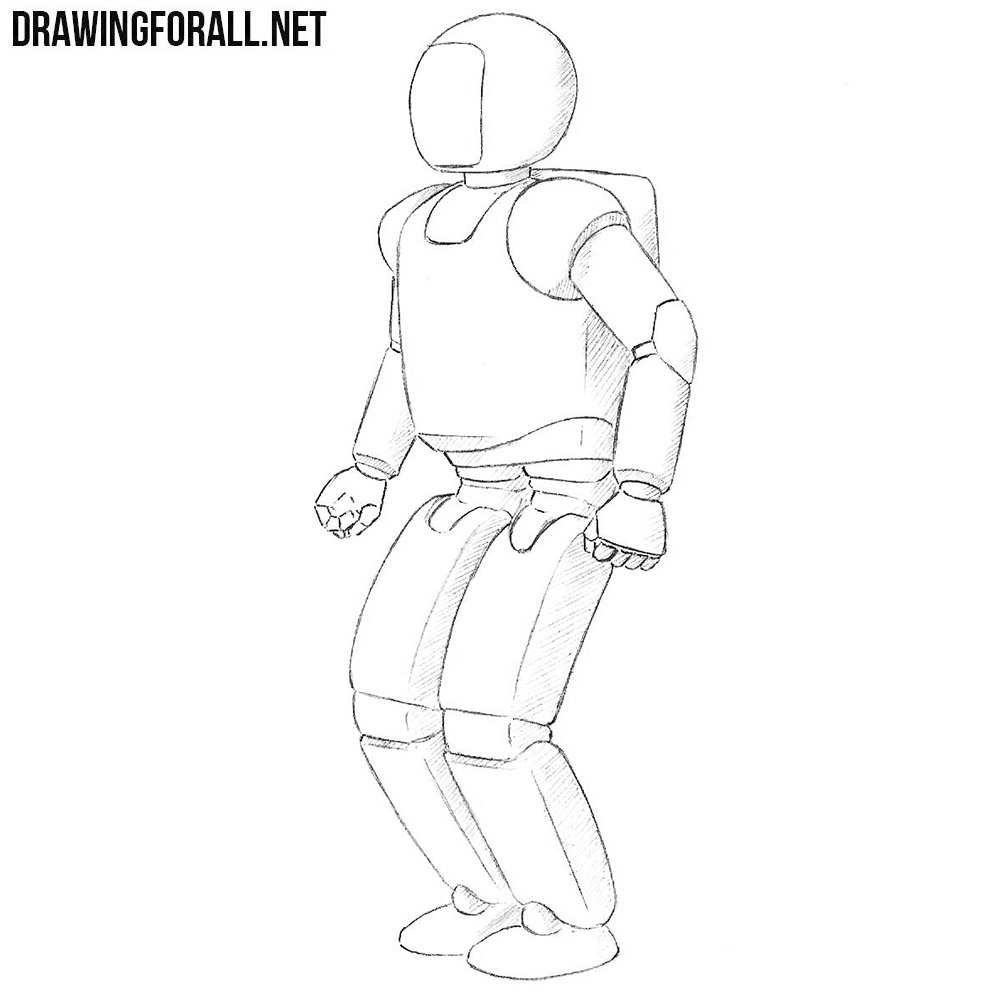
With this drawing tutorial even a little baby can draw the robot. First things first we need to draw a stickman the man made of sticks and circles. Step 4 Draw circles for the shoulders and joints.
You will then draw the antenna lines and after that draw the guidelines for the robots body arms and legs. Draw a circle for the head and then add the facial gudielines. Eyes and Fenders 3.
Below the head draw a tiny rectangle to form the neck. Attach the motor and battery setup to your cup. And who better to lay down the nuts and bolts than robot supremo Mike BrownlowDont touch that dial.
Dont forget to draw cute round eyes. Next draw the body wire frame and move to step two. First use a few basic shapes to draw the head the body the arms and the legs.
Draw a control panel. Add stripes to the tube and then draw bulky square brackets for hands. Draw three ovals for the wheels.
Add details to the head and neck. The feet are made from circular shapes cut in half. So lets start this lesson and learn how to draw a robot.
Finally draw a small square to illustrate the body. Fixing your robot is just a matter of straightening up the legs and the head and a few other bits and pieces this is the final details of your robot drawing just to try and get it right. This concept was specially made for those of you that havent a clue how to go about drawing a robot.
Step 5 Draw long rectangles for the legs and then draw semicircles for the feet. Finish the Arms and Claws 5. Draw the robots head and body An easy step simply outline whats on your.
Using straight lines sketch out the. Paint the light bulbs in light yellow. Add lines to the arms.
Some electronics projects can feel overwhelming if you need to pull out a soldering iron. Eyes and Fenders Use oddly curved V-shapes to form fenders for each outer wheel. Outline the robots arms and hands Lets start outlining and improving our robot sketch starting with the arms.
2 From your drawings choose a design you like the most. Step 6 Detail the chest with whatever you think of such as meters arrows and small switches. Thankfully this isnt one of those projects.
Today we were drawing a robot if you want to draw another metal guy. Add a rectangle head and neck lines. Draw two matching legs and feet.
See the illustration below if you need an image to help you figure out how to create this part of the tutorial. Thicken the shape of the antennas and then draw out the eyes as well as shade them in a bit. Next draw 2 thin rectangles either side of the top of the body then add a long thin tube coming out of each.
By using silhouette drawing you can record your ideas and decide what robot you want to draw. Add wires to both leads of your DC motor and secure with electrical tape.

Jesse Acosta Ar Twitter How About Some Robot Legs Having Fun Figuring Out The Fiddly Bits That Make Robot Parts Interesting To Look At Https T Co Wtqofl8lcj Twitter
Robot Leg Images Stock Photos Vectors Shutterstock

Quick Warming Up Before Work Sketchy Legs Foot Mech Mecha Robot Drawings Characterdesign Pen Robots Drawing Robot Concept Art Concept Art Characters
How To Draw A Robot

Learn To Draw A Robot In 9 Easy Steps How To Draw An Android With Pictures Improveyourdrawings Com

Drawing A Robotic Leg Tutorial By Dxbigd On Deviantart
Shoulders Draw Robots Joshua Nava Arts

Scott Robertson Spaceship Google Search Illyustracii Robotov Kiberpank Fantasticheskoe Iskusstvo
0 comments
Post a Comment